EconoSpace Ideas & Tips
Cleaning FrameSpace

Framespace: Although standard 1/8" frame/glass allowance will work, it is recommended to minimize this allowance to prevent the glass from shifting so much in the frame. Remember that the spacers will shift with the glass and will become more visible under the lip of the frame.
Econospace: A 1/32" or at most a 1/16" allowance is recommended to keep the spacer from shifting too far.
It is recommended and always good practice to take a few seconds and swipe (seam or bevel the edges of) the glass slightly before you clean it or apply spacers. This will make it much easier and safer to apply Framespace and with Econospace it will help keep the glass from chipping in metal frames. Use a whetstone, a hand seamer, or a smooth river rock. Just a couple of light strokes is all it takes.
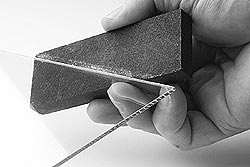
FrameSpace Cuts easily with anvil pruners

After swiping and cleaning the glass (See above), attach a small piece of Framespace to one corner of the glass to use as a gauge for spacing the first side. (See Below). Attach the first side against the gauge piece and cut the other end flush with the edge of the glass as shown. Continue around the other three sides of the glass in the same manner. If you use sharp anvil pruners or fillet shears, the Framespace won't crush and you'll get a nice clean cut.

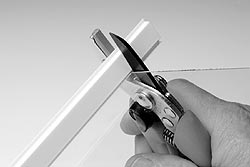
Cutting Econospace
Since you can't rely on the adhesive for permanence, it is recommended to either miter or at least support the ends of the top piece by applying the Econospace to the glass.

Adhere Econospace to the glass, not to the frame.
Adhere the Econospace flush with and to the edge of the glass rather than to the frame to insure the best possible bond and maximum engagement over the face of the art or decorative backing as shown above. The glass is the best surface for bond permanence. Do not "Center" the glass in the frame by applying theEconospace half on and half off the glass. The weight of the glass will shear the adhesive on the bottom spacer and the top spacer will only be held on by half the adhesive. It will sag.
Framespace & Econospace may be stacked


Framespace can be stacked as shown to achieve some very unique and effective frame jobs. All Econospace can be stacked as shown above. You may find it less expensive, easier, and more attractive to use Framespace in one of the larger sizes.
Fitting the frame
Stack up the backing, the art, and glass (with the spacers attached) face up on your fitting table. Check for dust and critters. In a wood frame, place the frame down over the entire package then flip it over and fit as usual. In a metal frame, join three sides then slide the whole package in face up. Flip it over and install the fourth side.
Caution!
When framing unmounted paper art, it is not advisable to cover the edge of the art with the spacer as even slight pressure against the art will cause it to buckle! The art will expand and contract with changes in humidity and it must be allowed to move freely in the frame to prevent buckling. The art may also be abraded by the spacer rubbing on the face of the art. A more appropriate method would be to "Float" the art as shown below.
In metal frames, instead of using spring clips, bond strips of foam board or mat board to the edge of the backing to almost fill up the space. If they are tight the art and the backing will buckle! (See below).
In wood frames, don't apply any pressure when installing diamond points, etc. Leave the entire package a little loose to prevent the art and backing from buckling. (See below)


Stacking Ideas
- This shows a sea shell glued atop a small pedestal of foam-core which gives the shell an interesting special look rather than just being glued down to the backing. We have added a strip of the same color mat board in the space behind the Framespace 3 Clear. Hold the mat strip into the back of the Framespace with a few of pieces of tape while cutting the Framespace to fit the glass. Cut through the mat strip and Framespace at the same time.

- The sea horses are framed using two layers of glass with Framespace 3 on each layer. The sea horses are glued to the second layer of glass with a little clear silicone glue. (Silicone glue is available in your grocery store.) This method can be used effectively for arrowheads, butterflies, dried flowers, etc.
- This method enhances the deckled edge and the character of hand-made paper. The print was hinged to a pedestal of foam-core (1 inch smaller all around than the paper) to give a floating effect. Framespace 3 Clear was used so that the color of the frame showed through instead of adding another color.

- The coin trick is done with two layers of glass and a mirror. The top layer of glass has Framespace 1 Black. The second layer has Framespace 3 Black. The coins are glued to the second layer of glass with silicone glue. (See detailed instructions below.) This trick works well with paper currency, playing cards, post cards, or any object that has an interesting back side. You can use two layers of Framespace 3 if the object is thicker than will fit with regular Framespace 1.
The FrameSpace Coin Trick
- Cut two pieces of SSB glass, one mirror, and one backing board all the same size with 3/32 inch frame allowance.
- Clean the Mirror and both sides of both pieces of glass and set aside to gather dust.
- Clean the frame rabbet and maybe even hit it with a light coat of matte spray if it looks like it will be flaky.
- Lay out the coins on the backing board to determine exact spacing. Outline the coins with a pencil to make bulls eyes. Lay one of the pieces of glass on it and set it aside for more dust collection.
- Clean and polish both sides of the coins as necessary. Remember that silicone glue will not stick to finger oils.
- Make a small handle out of masking tape like this:

Then stick it lightly to the front of the coin like this:
Line the handle up with some prominent feature on the coin like "Top." - Apply an almost continuous string of tiny beads of silicone to the back of the coin on just the very edge. Be careful here and remove any big globs because they will show very nicely in the mirror. Hold the coin just slightly above the glass and drop it over the bulls eye. Don't touch it! If you move it even a little bit the glue will smear and show. The weight of the coin is enough to flatten the glue. Wait at least three hours before handling the glass. After the glue has cured, hold the coin down with tweezers, or something similar, when you remove the tape handle. Wait until tomorrow to deliver the frame job to let the glue finish curing.
- Attach regular FRAMESPACE 1 to the top piece of glass and FRAMESPACE 3 or 5 on the glass with the coin on it. Stack both up on the mirror and backing. (See cross-section diagram above.) Chase dust for a while and set the frame down over the glass and spacer assembly. Take it all apart, remove the last of the dust and try it again. Fit and hang as a usual frame job.
NOTE: Advise your customer that you are going to use silicone glue on the coin. It is completely removable with lacquer thinner but some collectors will not stand for glue on their coins. Find another method for framing their coins. Also warn them that if they look closely they're liable to see some glue in the mirror. Show them what a nice job you did on the sample frame and explain how tricky a job it is. Cover yourself.

- This may be the answer to the frame job that requires a piece of glass both front and back while still allowing the necessary air-space for conservation grade framing and keeping art from buckling. The Framespace is attached to the BACK piece of glass, the art is hinged with T-hinges to the back glass. After the frame is completely together and squeaky clean, remove one side of the frame at a time - face down - and apply a small bead of silicone glue to the edge of the Framespace. Put the frame piece back on, take off the next side, glue, etc.
Our new FS 1/4" Double will make this type of job very quick and easy. It also seals the whole glass and art package (except at the very corners) from intrusion of dust and critters. In wood frames cut the allowance tight and use a small bead of clear hot melt glue all around the back to hold the whole package in.