Feb 13th 2016
Art Hinging Tips
The most time-tested method of attaching paper art in a frame is wheat starch paste and Japanese paper hinges.
"Feathering" the edges of the hinge paper by "Wet Tearing" is universally recommended to avoid embossing and cockling of the art. It is also important that the size and number of hinges and strength of the hinging paper be appropriate to the weight and size of the art paper.
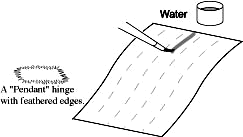
Fig. 1. To tear "feathered" edges first wet a line parallel with the chain lines in the hand made Japanese mulberry paper.
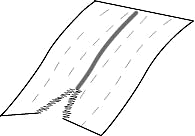
Fig. 2. Fold the paper along the wetted line and gently pull it apart making long feathered edges.
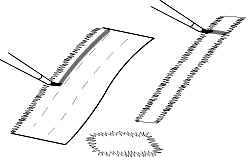
Fig. 3. Continue wetting and tearing to make hinges with feathered edges on all sides.
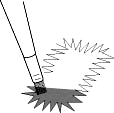
Fig. 4. With a small soft brush, apply the wheat paste to the long fibers of the hinge from the center outward, spreading the fibers like a fan. Only apply the paste to about 6mm (1/4") along the end of the hinge.

Fig. 5. After the paste has dried some (see note below), place each hinge on the back of the art about 6mm (1/4-3/8") down from the edge.
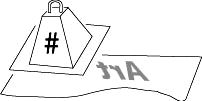
Fig. 6. Cover the hinge with a blotter and a weight and allow to dry 10-15 min.
Note: Hinges applied too wet will cause the art to cockle, too dry and the paste will not form a strong bond.
After a hinge has been pasted out, look at the pasted area in raking light - wet paste is shiney. When the pasted area appears dull, the hinge is ready to apply to the art.


Pendant hinges used in "Shear" are much stronger than when used in "Peel". In "Shear", the whole bond must be overcome at once. In'"Peel", the bond is overcome a little at a time and has very little strength. You'll have to try this yourself to see the difference.
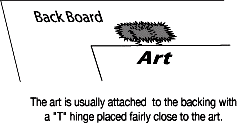
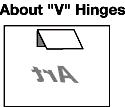
"V" Hinges are very weak because thay are in the"Peel" mode. Adding a "T" hinge will make the hinge stronger but only on one half of the hinge.
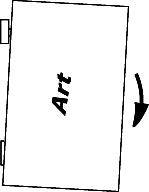
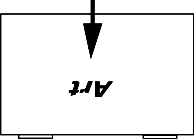
If the frame is turned sideways or is inverted, the hinges will change from the"Shear" to the"Peel" mode and will fail.
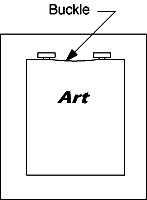
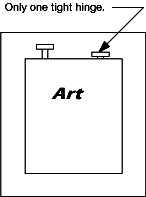
If you put two (or more) hinges with "T"s close to the art - the art may buckle between the hinges as it expands and contracts with changes in humidity.
Put one "T" close to the art and all the others at the tips of the pendant hinges. Now the art can expand or contract and the long pendants will swing and keep the art from buckling between the hinges.
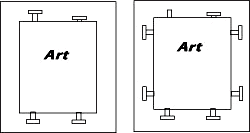
Additional hinges at the bottom (or on very large/ heavy pieces, even on the sides) will keep the hinges from"Peeling" if the frame is inverted. Shipping hinged art is always problematical and hinging in this fashion should eliminate many of the hinge failures. The bottom and side hinges should be attached slightly loose to allow some movement due to expansion/ contraction of the art and backing board. Hinges will not flatten buckled art but a good paper conservator can usually help.
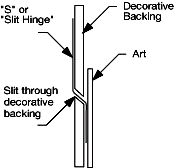
"S" or"Slit" hinges for floating art
This method of hinging is quite effective visually if the art has a deckled edge. Make sure that all but one hinge is"loose".

Cross section through "S" or "Slit" hinge for"Floating" art on a decorative backing.

Rear view of"S" or "Slit" hinge T'd loose to allow for expansion/contraction of art.
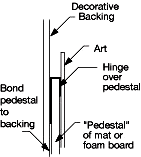
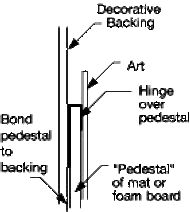
"Pedestal" floating
Floating the art on a pedestal of mat or foam board is another method of framing that shows off deckled edges with a shadow. Use the same method of one tight "T" hinge and all the rest loose "T's". Bond the pedestal in several places with a flexible adhesive to allow for some expansion and contraction and for easy removal.
Cross section through hinge area of a "Pedestal" mounting for floating art.

